Here is my finished product.

I love how the yellow flowers pop and how the stark white Fleur De Lis looks.
I didn't get all the pictures I wanted during the process because my phone died.
I'll post the ones I did get.
2 burlap rolls - brown - approx. 10yards
1 roll colored burlap (I couldn't find any rolls so I bought 1 yard of yellow burlap)
green metal wreath (mine is about 18 inches)
Ribbon or patterned burlap (mine is a Damask Canvas ribbon)
Fleur De Lis wodden icon - 12"
1 pkg pipe cleaners to match burlap color
scissors
Hot Glue & gun
paint (acrylic paint of your color choice)
paint brush

not pictured: hot glue sticks/gun, scissors, paint, & paintbrush
First!!!
Paint Fleur De Lis and allow to dry
Wreath making:
First I cut a bunch of the pipe cleaners in half.
Next you take one of the rolls of burlap and secure an edge to a crossbar at the top of the wreath.
Then you take the burlap from the back of the wreath and pull about 6 inches through.
Do this through all 3 openings in the wreath form.
I went from left to right and once I was at the bottom I went middle, top, middle bottom.
Each time you get to a cross bar, attach the section with a piece of pipe cleaner.


Once you have gone all the way around. Fluff and adjust your sections to make them nice and full.
Now, take the ribbon and from the front of the wreath, find a starting point
and attach it to a piece of the wire form with your pipe cleaners.
Move the ribbon around the wreath attaching at intervals to your liking.
(My ribbon was only 3 yards and did not make it all the way around the wreath.
I used this section to place my Fleur De Lis.)
For the flowers:
First you need to take and cut your burlap into strips. As you can see I couldn't find a tape measurer so I used a large candy bar I had in my office as the guide. It is about 3 inches wide.


For the small flowers I cut the burlap in half (making it go from about 36 inches in length to 18)
For bigger flowers leave burlap longer.
Now for the hard part. Fold burlap lengthwise. Take one edge of it and place a small amout of hot glue.
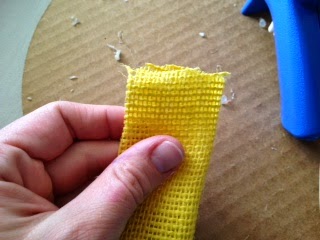
Roll this up tight so that the end stays together. Continue to roll two or three more times.
It should look like this:

Now, you should continue to move the fabric around the bud/center you just made. But instead of pulling it tight around the middle, let it be looser and gather it together around the bottom.
I glued as I went so it stayed together.

Continue to wrap and glue.

Once you get to the end of the burlap, glue the end down so the rough edges aren't showing
Then you will flip your flower over, trim excess strings, and glue the bottom together.

And here is your finished flower!

For larger flowers, only fold the top of the burlap down about 1/4 of the way.
(or you could cut your strips larger)

Once you have all your flowers made and you find the placement you like on the wreath,
use your hot glue to glue them into place.
Next step is to flip the Fleur De Lis over and to hot glue 3 full length pieces of pipe cleaner onto it.
One near the top, one in the middle, and one near the bottom.
Make sure to only glue about an inch to an inch and a half to the decal.
After the glue is dry and hardened, use the pipe cleaners to attach it to the wreath.
Now, you're all done and can display it beautifully on your front door!
Good Luck and Happy Crafting!
~Amanda Storrs~
For more tips/tricks, here are the sites I used as my tutorials:
Wreath Ideas:
here is the one I used
This one may be easier but I'm not sure
Flowers:
No comments:
Post a Comment